Here’s everything you need to know about performing the hip thrust—the best exercise you can do for strong and muscular glutes.

The hip thrust has become one of the most popular exercises in the gym in recent years.
Although some may find the exercise a little intimidating at first—you are launching a barbell into the air with your hips, after all—the exercise is easy to learn and doesn’t require a ton of equipment (besides your trusty hip thrust pad).
And more importantly for those who want to develop muscle in their backside, there’s no better exercise when it comes to developing muscle and strength in the glutes.
In this guide to mastering the hip thrust, we are going to cover everything you need to know about hip-thrusting like a champion.
Let’s jump right in.
The Hip Thrust – Overview
The hip thrust is a modified glute bridge.
But instead of laying on your back, with hip thrusters the shoulders are raised and there is a greater hip hinging movement.
It’s also the best exercise in the gym for developing strong glutes.
Unlike other exercises that work the glutes, from squats to Romanian deadlifts, the hip thruster nearly exclusively targets the gluteus maximus muscles.
The hip thrust is the best weightlifting exercise you can do to improve glute strength and build muscle1.
Glute activation happens primarily when the hips are extended, and the vertical nature of this movement provides maximal resistance to this muscle group.
Additionally, because of the way the legs are set-up in hip thrusts (knees bent, hamstrings dangling) and because the back is taken out of the equation (save for some erector spinae when you hit hip extension), the movement zeroes in on the glutes like a laser.
There are a lot of other benefits of the hip thrust, including developing horizontal speed (perfect for athletes who need to move fast), plenty of variations for ability level and training goals, and it can be used as an activation exercise for heavy leg days.
How to Do the Hip Thrust – Step by Step
Here’s how to perform the hip thrust like a boss:
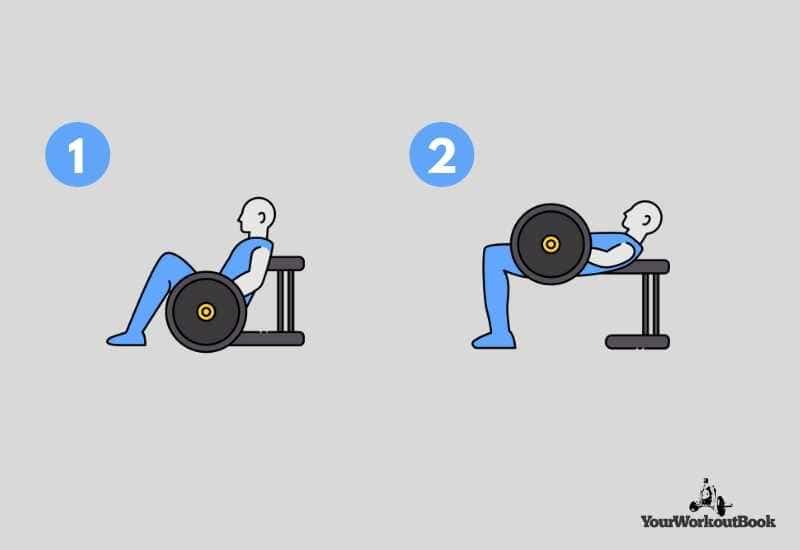
⭐ Line up the shoulders. Lean against a bench (or a stackable step platform or a foam plyo box) and make sure that the bench is lined up with the bottom of your shoulder blades.
⭐ Sink the barbell into the hip crease. Roll the loaded barbell over your legs and stop it over the hip crease. If you don’t have a barbell hip thrust pad, this is the moment that will convince you to invest in one.

⭐ Knee should be 90-degrees when resting. Foot placement is crucial with hip thrusts. The goal is to have the shins be vertical at the top of the lift.
⭐ Lift-off! Brace your core, contract your glutes, and separate the weight from the ground.
⭐ Drive the barbell with your heels. As your raise your hips, drive with the heels of your feet. This will keep the bulk of the muscle activation where it should be—in the glutes!
Pause at the top of the lift on your final rep for 3-10 seconds. This will reinforce proper hip extension2.
⭐ Lock out the hips. At the top of the lift (the concentric phase), lock out your hips. This means that you can draw a straight line from your knees to your shoulders. Do not hyperextend the spine to get an extra inch or two out of the movement, and if you can’t get the barbell to lock out position, use less weight on the barbell.
⭐ Lower the bar. In a controlled manner, lower the barbell back to the ground in the eccentric phase. One rep in the bag!
There is a growing number of hip thrust machines at local gyms (and available for home use). FOr a detailed look at the best hip thrust machines, click here.
The Hip Thrust – Common Mistakes
While the hip thrust looks like a supremely simple exercise—what could be simpler than dry-humping a weight towards the sky?—there are some key technique mistakes that I see over and over again in the gym with this exercise.
Flared feet.
The feet should in a neutral position during the lift. Some mild flaring is okay, but they should be shoulder-width with toes slightly pointing out.
Incorrect knee angles.
One of the toughest parts of this lift is getting the knee position correct. Your first time out with this exercise, go without weight to estimate foot placement so that your shins are vertical at the top of the concentric phase.
Not going into extension.
The money spot on this exercise, where peak gluteal activation is happening, is when the hips are extended.
Not when they are overextended (i.e. your spine is curved and the barbell is three inches above your knees and chest) and not when they are under extended (three inches short of a straight line between the knees and shoulders).
If you are struggling to get to full hip extension, use less weight.
Naked barbell on the hips.
As you get stronger with this exercise, you will definitely want to pad the bar, either with a barbell pad, a dedicated hip thrust pad, or folding up three yoga mats and stuffing it between your hips the barbell (just kidding about that last one, but hey, if it works…).
The barbell will move and bounce slightly, especially once you hit extension, so protect your hips and private parts by padding the barbell so that it doesn’t bruise the pelvis.
The Hip Thrust – FAQs
Can you do hip thrusts at home?
Hip thrusts can be done at home without weight, with a weight plate (lay it across your hips), kettlebell, or if you have a home gym, with a barbell.
While lifting heavy with hip thrusters will require more equipment, for bodyweight hip thrusts all you need is a sturdy bench (or something comparable), and off you go.
Should I use a short barbell for hip thrusts?
Yes! Short barbells are much easier to control compared to longer barbells. Olympic barbells, for example, are over 7′ in width, which can cause the plates to wobble as you get stronger on the exercise.
A shorter barbell while doing hip thrusts decreases the teetering and gives you more control of the weight, which translates to more effort driving the weight upwards versus trying to balance hundreds of pounds of weight.
How high should the bench be for hip thrusts?
One of the main problems lifters experience with this exercise is not steadying themselves properly on the bench when setting up.
The bench should line up with the bottom of your shoulder blades. This helps ensure that you are hip hinging the weight up instead of laterally.
Lateral movement of the body will cause the bench to slide and wobble.
How often should I do hip thrusts?
Hip thrusts can be done frequently as they are an isolation exercise that doesn’t drain your nervous system, unlike closed-chain, compound exercises like squats and deadlifts.
The exercise can also be used in a multitude of ways, including as an activation exercise before a big day of leg lifts (nothing opens up your hips and fires the glute muscles better!) or when you want to go heavy.
For hypertrophy, aim for 2-3 heavy lifting days a week, doing 3 sets of 8-12 repetitions.
The Bottom Line
Look, I get it.
This exercise can make the bashful gymgoer blush like a tomato. After all, this is essentially a dry-humping motion.
And the first couple of times you perform this exercise with weight, you may find the barbell wobbling a little bit.
But this is an exercise used by some of the top elite athletes on the planet, and for good reason: it has the unparalleled ability to give you strong, muscular glutes.
Which will help anyone, whether that means improving performance in the gym, being more explosive on the court, or simply looking good in a bathing suit at the beach.
The next time you hit the gym, pull up a bench, unleash the almighty hip thruster, and grow those glutes.
Related Hip Thrust Guides:
8 Best Barbell Hip Thrust Pads for Monster Glutes. Hip thrust pads are a quick way to protect your hips, stabilize the bar, and push more weight. Here is a breakdown of my favorite barbell pads for hip thrusts.
5 Best Hip Thrust Alternatives for Epic Glutes. Are you looking for some hip thrust alternatives to spice up your glute training? Here are some alternate exercises you can do at home or at the gym.